Make-it

Sunday, October 15, 2006
makeit.ladynthread.com

While most of this blog is about crochet, which is my main passion, I'm primarily really about making stuff!

I needed a project when I first started teaching myself how to do frames in html -- so I went to my collection of "how to make-it" articles. My collection is old newspaper and magazine clippings, handwritten notes, handouts from Girl Scout and 4H seminars and anything free and generic that has been around for ages.

The result is a website I call "Make-it" and it is my special gift to the crafting community -- enjoy!

October is Breast Cancer Awareness Month

Wednesday, September 27, 2006

This year a beloved aunt lost her fight against breast cancer.

In remembrance, I crocheted a couple of pink beaded bracelets for me to wear every day during October (Breast Cancer Awareness Month). Visit The National Breast Cancer Awareness Organization to learn how you can help the fight against breast cancer.

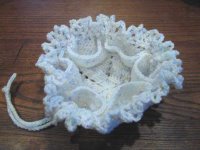
Travel Jewelry Pouch

Wednesday, August 16, 2006

Little projects like these are when I sometimes have the most fun crocheting. I love reading the pattern, crocheting, assembling and then figuring out who will be the recipient (like most crafters I've met, I rarely keep the finished item for myself -- it's all about the giving.)

The designer is The Crochet Dude and it's a free pattern that you can find here.

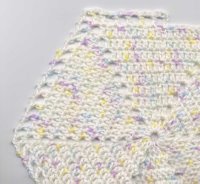
I didn't have any problems with the pattern until Round 10 which I rewrote to get the symmetry that I am so obsessively compulsive about. Here is my rewrite and a photo of how the round begins (my version):

Rnd 10: Ch 5, *(skip one dc, dc in next dc, ch 2)repeat from * up to the ch-2 space; (dc, ch 2) twice in ch-2 space; dc in next dc, ch 2, repeat from * around ending with a slip stitch into the 3rd chain of beg ch-5.

Finally, I had a problem interpreting the assembly instructions, which read: "Attach the layers together by stitching through (it is odd wording .... what did he mean by through??) the ch-2 spaces and creating V shaped pockets". I got the gist of it (make V shaped pockets!!!) but was there something special being done by stitching through the ch-2 spaces??? I finally just whip stitched together the 12 sides which were formed by the ch-2 spaces.

Maybe I was just being dense in thinking that there was something special and/or different being done with the assembly but the real disappointment was that I made two posts for help on the CGOA (Crochet Guild of America) membership message board and received NOT ONE reply.

By the way, the Travel Jewelry Pouch went to my granddaughter :)

Homespun Afghan

Monday, August 14, 2006
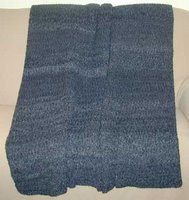
This is the last of my planned projects that involve working with Homespun yarn from Lion Brand. Once again, working with Homespun presented a problem. This time it was the consistency of color between skeins. Some skeins had much more in the way of lighter highlights and other skeins were mostly grey (I used the color Edwardian). Thank goodness I noticed it fairly soon (not when I was buying it but at least early on in the work.) I alternated lighter and darker skeins to get a striping that looks fairly natural and planned. All's well in the end but just one more annoyance to add to the Homespun saga (see blogs Plaid Baby Blanket and While You Recover Afghan.

This afghan was a thank you present to my daughter for her help getting me through an English Composition class. Thanks sweetie!! I couldn't have done it without you. It is also the biggest afghan I've ever done (60" x 72") -- a snuggleghan for her and her hubby :)

Homespun Afghan pattern

I don't have any Homespun patterns on my wannado or my wips's and I'm going to swear off working with it until memory fades.

Plaid Baby Blanket

Sunday, August 13, 2006
I haven't been able to get away from working with Lion Brand's Homespun yarn. I keep finding patterns I like for it and projects I need to make.

This little baby blanket should have been done quickly and with no problem. However, like any project of mine, *#%@ happens. First, I couldn't find Homespun baby at my usual haunts of A.C. Moore or Michaels (I later found it at JoAnn's). So I needed to switch to the regular Homespun line and pick colors. There are two things that terrify me the most about any project, the first is picking colors and the second is embroidering faces onto dolls. Usually when I'm picking colors I bring along my husband who has a good sense of matching colors (left on my own I just pick tone on tone or exactly match pattern specs.) Luckily this time I had talked my daughter into coming with me (Frappuccino's at Starbuck's are wonderful bribes) and she guided me through my color psychosis.

That should have been the end of it. It was an extremely simple pattern and therein was the problem. The pattern was so easy I worked it while not really paying attention and crocheting with Homespun and not keeping my eye on the stitches is a recipe for disaster. Once again, I kept missing the turning chain and sundry other stitches. And once again, I ripped as much as I stitched. *HUGE SIGH*

The pattern for the Plaid Baby Blanket is here. However, it appears you need to have signed up with Lion Brand to see it. My advice -- MAKE IT UP. You do not have to give these people real information in any way, shape or form. I have an internet persona made up just for this purpose and I hope if mucks up the demographics of every site I use it with.

Crochet Flower

Thursday, June 29, 2006

These flowers evolved from a pattern for a knit flower. The girls in the knitting class I teach asked me to knit them a flower from a pattern they saw in one of my books.

I tried. I really did. But I just didn't like the way the flower came out so I designed and crocheted these instead --I think they want to learn how to crochet next :)

Crochet Flowers pattern


Crocheted Socks --Start to Finish

Monday, June 26, 2006

 Ravelry Project Page -Toe Up Sock

I started this project when the Crochet Guild of America ran its first Crochet Along. I have always wanted to try making a pair of socks. I'm not really a sock person (see post about my beaded foot sandals but I'm always interested in learning new techniques and, as always, I love to make stuff!

The CAL (crochet along) was broken down into five tasks and here are my notes and pictures about the project:

Task 1 - Gauge Swatch (no photo) With an 0 steel hook and Lana Grossa Meilenweit Cotton (multi jacquard, color 405) yarn I was able to get a spot-on gauge both stitch and length (very rare for me!!). However, my swatch was worked back and forth and the pattern is crocheted in the round; my gauge changed once I started working the socks. This proved to be ok in the end because I needed to decrease the number of stitches to fit my foot but my next sock swatch will be worked in the round to get a more accurate gauge.

Task 2 - Toe
This task went really fast and I worked it through all the recommended rounds. I found it difficult to judge the fit of the sock at this point and it wasn't until the next task where I could tell that the toe was too big.

Notes: I started the toe using the slip stitch into the bottom loop of the beginning chain method featured in the book Crocheted Socks! by Janet Rehfeldt and Mary Jane Wood. Also, adjusting the size of the sock would be here and I'd like to figure out a calculation for various foot sizes so that I can easily make socks for family/friends.

Task 3 - Foot
After a few inches of straight work the sock was turning out to be too loose around my foot and I frogged back to row 9 and starting working with 58 stitches for the foot body. The book Crochet Socks! recommends that the sock measure ½" to ¾" inches narrower than the measurement around the ball of the foot and once my sock fit well on my foot my measurement was falling in that range. Because I knew I was going to be crocheting a longer foot than the pattern I should/could have adjusted when I made the top of foot increases. Instead of 4½” up I could have gone 5½" or 6" but I don't really notice a major difference in fit because of this. The length of my sock at the end of Task 3 measured 7½".

Task 4 - Ankle & Cuff
I added 4 stitches to the starting chain that began the ankle/cuff section. Originally, I added 1/2 of the 58 stitches (in keeping with pattern proportions) and tried increasing as I went but this resulted in a tight fit over the ankle so I frogged back and did all my increasing in the starting chain. Other than that this section was straight forward and I look forward to experimenting with different cuffs in future socks.

Note: I began working my sc's in the back loop of the starting chain. I do like the sturdier feature of this technique when working both ends of a chain.

Task 5 - Heel
This went smoothly. I did forget where my ends stopped/began so my heels finish with two different stripes but it wasn't worth frogging.


Misc Notes:
  • I worked both socks at the same time and kept the striping the same for both socks (this strategy held through the heel where I did not start the second heel in the same spot and so the heels are different -- but who really notices that? LOL)

  • When I bought the yarn I was told that crocheted socks use more yarn than knitted ones and it was recommended to get two 100 gram balls. This was wise advice because I have big feet and like taller socks. I would never have been able to finish this with one skein.